Thursday, February 12, 2015

Handy Cards Collection !!


Have you gone through our entire collection?

Go for it now

Here's a video.... 

Do watch it and share your views about the following video with me


Thanx for visiting !!!!


To Contact: Click Here

Love Season

   
           Hey everyone ! I hope you all missed me as I'm back again after a long time but the reason for my disappearance was quite a genuine one. I was busy for my exhibition preparation and thanks to Allah Almighty It went very well. Displaying your work for the first time makes you totally nervous. But the nervousness was all gone by the initial reaction of each and every visitor. All were amazed even some were not ready to believe that the cards were wholly handmade. Some of you may be thinking I'm exaggerating but seriously the reactions and complimentary statements made me speechless. Well you don't need to be curious as I'll be very soon sharing pictures of the event.
        Apart from working for exhibition day and night, I experimented some new ideas which are now core of my work and are much appreciated than my previous work. I would be sharing those ideas with you in a few days. Right now as the love season is just approaching and 14 Feb is no more away I'll be sharing some of my creative cards related to that. So if you people have yet not thought how to express your love with your loved ones just have a look on the card I'm going to share, make it yourself or get benefited by my services through my facebook page.


Materials Required
  • Card stock
  • grey corrugated sheet
  • printed sheet for background
  • white button
  • twisted red and white thread
  • silver and black pens
Procedure:


               Simply take a card base which ever funky colour you like, as it is a card based on a love theme so I went for a red base. Take a printed newspaper sheet you can easily get it from any artshop.
Paste this sheet on the cardbase leaving the border columns in addition to that edges should be rounded to give it a more tidy look.
               Now move on towards pocket making. Take a grey corrugated sheet cut it in a pocket shape. paste it on the sheet fastened on the card already. Now take a black glittery sheet and cut it to strips to border the pocket. Now take a black foamic sheet cut it to make a 2-D boy and girl and paste it on silver reflecting sheet. Cut that sheet in a way that it enclose the foamic boy and girl. Now with a red marker border the pocket with dashed lines. Take a thick red thread and a needle and adorn the pocket making the pocket with three stitches on one side from top to bottom with one finger gap.
              Come to the tags in the pocket now. Cut the red hard card into three equal pieces and paste  A-4 sheet in the centre of each with a different colour. Again border the tags with dashed lines. Cut three mini circles out of corrugated sheet and attach 3 black buttons each on a single tag. Tags are now ready to write on them. Take a twisted red and white thread, infix a medium sized white button and fence in the lower part of card with it.
              Your card is Ready now


 Thanx for visting and do share your views!!!


                                                To Contact ; Click Here


Thursday, September 26, 2013

Daddy's Princess


 Dear Summers! I want you to leave me alone now. Thursday was not fine at all. It was too hot to work on my creative part. That's why I chose evening time to create post, its little bit cooler than day time. I tried something new with my new themed card. 
Something I try for my every card is to add life to them by using new ideas with tempting colors. 


This was something I really made for daddy's princess from their Daddy's. Daughters are precious gems and should be cared like gems. Keeping all this in mind I specially designed this card. 
lets begin!


 Material required:


  • Purple and pink card stock
  • Glittery golden sheet
  • medium sized diamondies
  • Key chain ring
  • pink and silver pen


How to make?

       I cut the glittery golden sheet in three segments, all the three with different widths. I cut the zig-zag edges of first segment and punched these edges. Then adhered diamondies on second segment of glittery sheet. Third segment is narrowest of all three. I then fastened all the three segments on cardfront with a space giving it a crown appearance. Now again I adhered diamondies just above the crown.
        Moving towards pink one. I cut squarely corners of it. Then I drew a large high heel shoe over card and cut it. I bordered the shoe with pink marker to enhance it. Pink card was to wrote all the greetings for which I used silver pen. Finally punched both cards from one corner and inserted a key chain ring to attach both of these. You can also use ribbon for this purpose of attachment.


Close-up view of pink card


Thanx for visiting!


Contact me on facebook at: Click here


Wednesday, September 25, 2013

Congratz!!


      Highly excited with each new day and energy boosts up when I get your admiration and messages loaded with love but day by day my responsibility is increasing towards you all. I now have to be more careful, and unique with my creative stuff showering all of my innovative ideas to my cards and upcoming projects.
   Although I shared my congratulations themed card earlier from my old cards collection but recently created a new one with the same theme. Here it is!


Material required:
  • Yellow and Blue A4 sheets
  • Silver and blue glitter glues
  • Black marker
  • Yellow mini pom pom
  • silver button
  • foamic sheet
  • golden glittered lace
How to make?

         On card stock I fastened the blue A4 sheet on upper part of card front and yellow embossed A4 sheet on lower part. Then with a black marker I designed a pattern on the left side of card's paneling. I then created a flower of hard card sheet and glazed it with blue glitter, bent its petals and fastened a pom pom at its center. I then fixed the flower over circular cut foamic sheet and fixed it over card's paneling. Just below the flower I inserted a template with congratulations greeting.

               Thanx for visiting!

                  Contact me on facebook at: Click here


Monday, September 23, 2013

TISSUE PHOTO FRAME


   It's rainy cold night! and 2 pm but what forced me to write at this time was just to share my new creation with you all. For last 2 days I was working on it while Sunday kept me busy with my fans and clients on facebook replying to them. So posting it here at this time.
            I've been working on cards creation for so many years but what I tried new is tissuepaper photo frame. But with God's  grace I was successful with my new challenge and received a great response from audience for my frame. 

Lets begin with frame.

Material required:

  • a raw wooden frame
  • tissue paper roll
  • hard card sheets
  • silver spray paint
  • pink glitter glue
  • silver stamped sheet
  • diamondies
  • Black velvet fabric strips
  • golden wires
How to make?

Firstly I covered all the four sides of wooden frame, both back and front sides, with card sheets and glazed them with tissue paper to make rough type paneling of frame. I painted the paneling with silver spray paint. Then I cut 4 mini butterfly dies and 3 flower dies from the same card sheet. I then bent the edges of flowers, embellished both butterflies and flowers with silver glitter glue and adhered them on the frame. After that I fixed twisted golden wires along the flowers. I bordered the frame with black velvet fabric strips to give it refined finishing. To further beautify it I put three dots with pink glitter glue both on upper and lower portion of frame. Finally you can decorate your frame with diamondies randomly fixed like I did. 
              
           Hopefully I'll work on more other projects like this. So stay tuned for that. 


                 Thanks for visiting!


              You can contact me on facebook at: Click Here

Tuesday, September 10, 2013

HANDMADE HOME DECOR


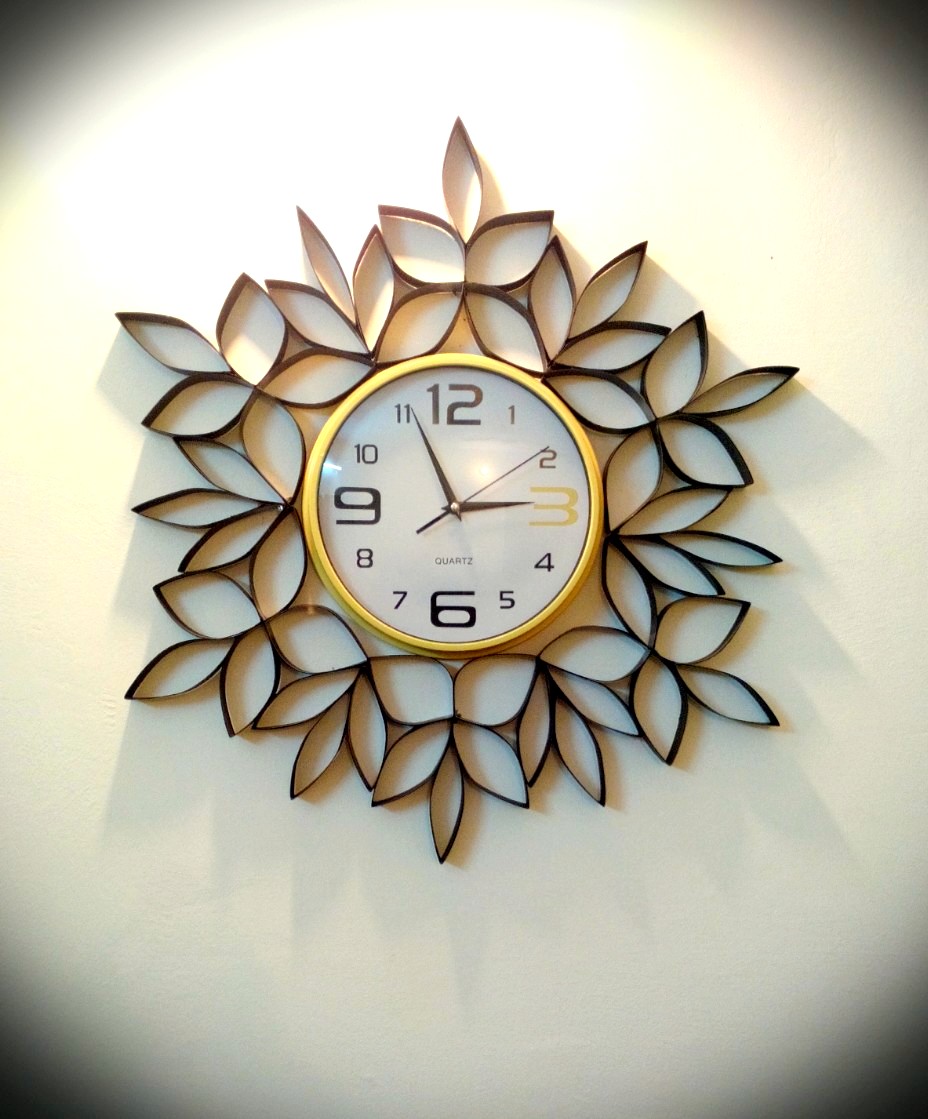
Hey there everyone! wana see something new I did previous week? Its 12 pm here already and my mom is knocking the door again and again to get in bed but seriously I can't sleep unless and untill I haven't shared my stuff with you.
I'm gonna share my handmade home decor with you today.


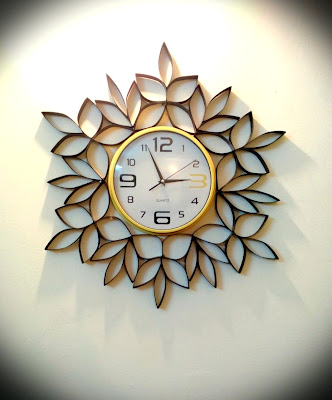
I already completed it last week but fixed it on my room's wall today so displayed it  today.

Materials required:
  • You need a simple rounded Wall clock
  •  black hard card sheets or toilet paper rolls
  • UHU
  • Cutter


How to make?


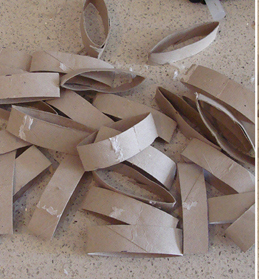
If you are using tissue paper rolls for this then you you should have a bundle of it.


         Firstly by using cutter cut the tissue paper rolls and press them like in the above image. They will appear like petals shape.Then attach these petals with each other in a form of flowers using UHU. Use spray paint of any color you want and spray it all over. You can then fix it on wall around the wall clock in circle.


 If you are using black hard sheets then you need to cut the strips of it with cutter in a large number. Fold these strips to make petal shapes and then do same as  mentioned above.


          Aah! Finally done...........
                          
    STAY TUNED! and share your views guyz 

                                                         Thanx for visiting!

                   You can contact me on facebook at: Click here


Monday, September 9, 2013

CUTTER CUTX


 Last week on facebook I received a message with lots of appreciation like all other messages from my fans. It was from laser cutting company who offered me to provide me with laser card cuttings with some samples. I found it very appealing for a while but then an inquiring thought stroked my mind     


‘Where would my hard work be lying in all this if I begin to use laser card cuttings and selling them as my product’? Wouldn’t it be cheating with my fans? And I turned down the offer. Then another thought stroked my mind but this time it was an idea!I put the card sample in front of me and instead of using any laser equipment I took out my cutter from my art box and begin to work.
Want to know how I made it?
Material required:

  • Red card stock
  • Pencil
  • White A4 sheet
  • Cutter
  • Pair of scissors
  • UHU      
How to make:
   Firstly I sketched the pattern with lead pencil all over the card front. You can design your own pattern also.
Then with the cutter I followed the pattern madewith pencil.I detattached all the flowers from card front except for 3 flowers and bent the petals of these attached flowers. 
    
        Tadaa! done with card... 

        Share your views guys

          Thanx for visiting!


   contact me on facebook at: Click here


Related Posts Plugin for WordPress, Blogger...